
Contouring for beginners is easiest when you add a soft shadow where your face naturally dips and blend until there are no harsh lines. The trick is using the right product, placing it slightly higher than you think, and keeping the color only 1 to 2 shades deeper than your skin tone. Here's exactly how to contour for beginners without looking muddy or overdone.
Quick Takeaways
- Use a contour shade, not a bronzer: Contour should mimic shadow, so it usually looks neutral or slightly cool-toned.
- Start light: A small amount of cream or powder contour is much easier to build than to erase.
- Place contour high, then blend up: This helps create lift instead of dragging the face downward.
- Match the formula to your skin type: Creams tend to look natural on dry skin, while powders can last well on oily skin.
- Blend until the edges disappear: The best contour is the one you can't clearly see as a stripe.
What is contour makeup and what does it do?
Contour makeup creates the illusion of depth. In simple terms, it makes certain areas look a little more recessed by mimicking how natural shadows fall on the face. That's why contour can make cheekbones look more defined, the jawline sharper, or the nose slimmer.
As a dermatologist, I've found that beginners usually struggle because they're told to paint on dramatic lines that only really look good under studio lighting. In real life, especially daylight, softer placement wins every time. So if you're learning how to contour for beginners, think subtle shaping, not stage makeup.
A quick rule: bronzer adds warmth, contour adds shadow. Bronzer is often golden, peachy, or terracotta. Contour is usually taupe, neutral brown, or slightly cool. You can wear both, but they do different jobs.
How do you choose the best contour product for beginners?
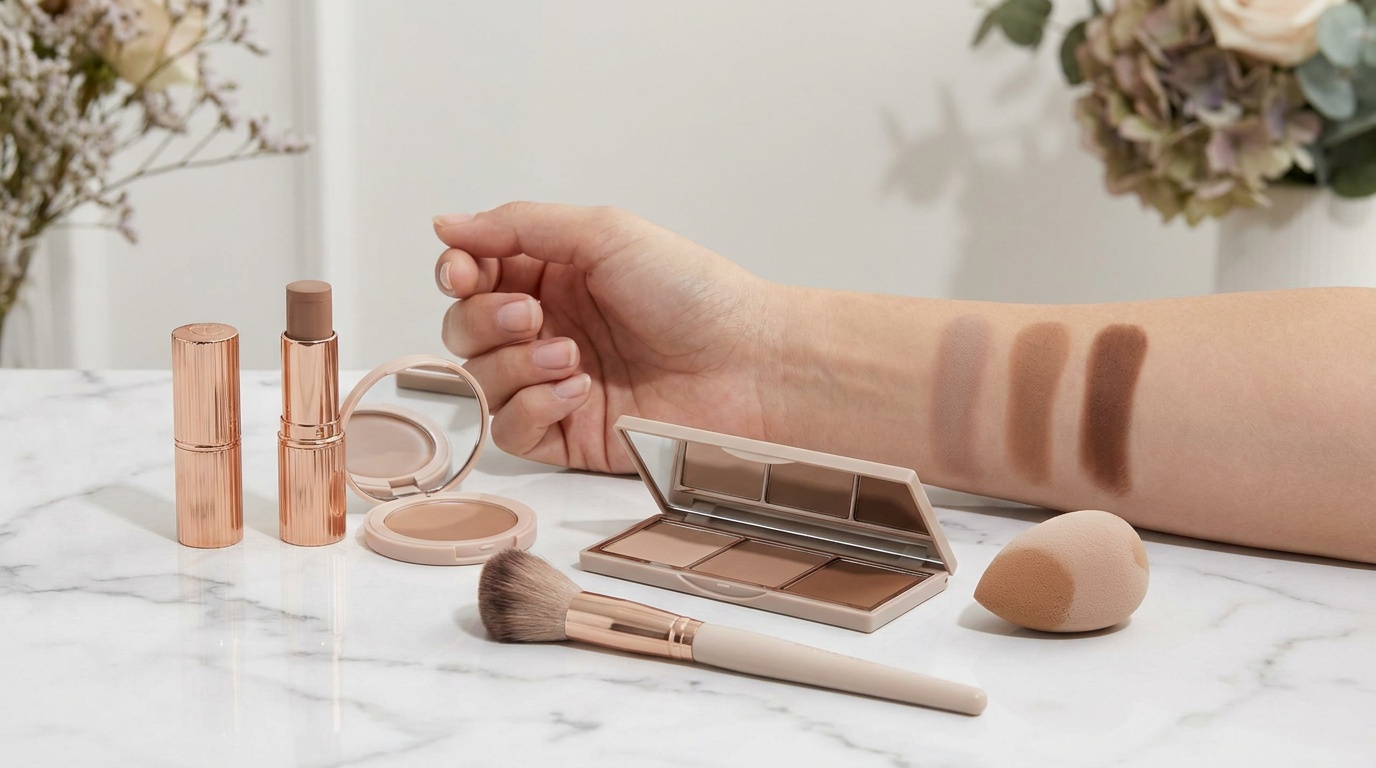
The best contour product for beginners is usually the one that's hardest to mess up. For most people, that means a cream contour stick, a cream contour compact, or a soft powder contour.
Here's how to choose:
- Cream contour stick: Great for dry or normal skin and very beginner-friendly because it blends easily with fingers, a sponge, or a brush.
- Cream contour compact: Good if you want more control and a skin-like finish.
- Powder contour: Nice for oily or combination skin, or if you already wear powder foundation.
A few shade tips:
- Pick a contour shade that's 1 to 2 shades deeper than your skin tone.
- Look for a neutral or cool undertone rather than orange.
- If you're very fair, a light taupe often looks more natural than deep brown.
- If you have deep skin, choose a richer neutral-brown contour that still reads as shadow, not ash.
Honestly, texture matters too. If your base makeup is very dewy, cream products usually melt in better. If you like a matte finish or live somewhere humid, powder may hold up longer.
Where do you put contour on your face?
The most flattering contour placement for beginners is usually on the cheekbones, forehead, jawline, and sometimes the nose. You do not need to contour every part of your face.
Use this easy placement guide:
- Cheekbones: Place contour just under the cheekbone, starting near the top of the ear and stopping around the outer half of the cheek. Don't bring it too close to the mouth.
- Forehead: Add a little contour around the temples or hairline if you want the forehead to look a bit smaller or more balanced.
- Jawline: Sweep a small amount under the jaw to create definition, especially if you want a sharper profile.
- Nose: Add very thin lines along the sides only if you want subtle shaping. Keep it soft.
- Under the lower lip: A tiny touch under the center of the lower lip can make lips look fuller.
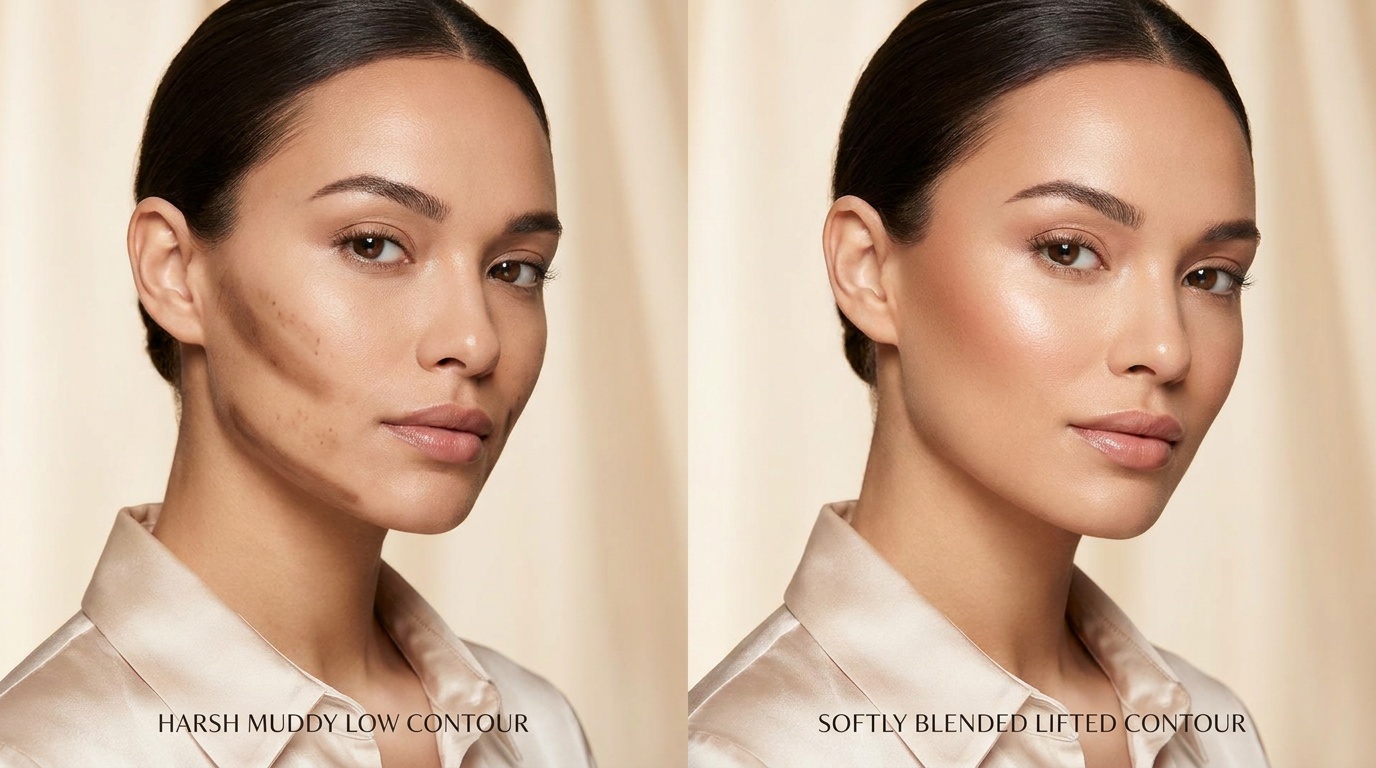
I've found that the biggest beginner mistake is placing cheek contour too low. That can make the face look droopy or muddy. Keep the contour slightly higher, and blend upward.
How to contour for beginners step by step
If you want the easiest routine, follow this order. It keeps things clean and natural-looking.
- Start with your base makeup. Apply skincare, sunscreen, and then your skin tint, foundation, or concealer if you wear it.
- Look at your face in natural light. Find where your cheekbone sits by feeling for the bone with your fingers.
- Apply a small amount of contour. Add a short line or a few dots under the cheekbone, at the temples, and under the jaw if desired.
- Blend upward and outward. Use a dense brush, damp sponge, or fingers for cream formulas. For powder, use a fluffy angled brush.
- Check both sides. Step back from the mirror and make sure the placement looks even.
- Add bronzer or blush if you want. Put bronzer above or around contour, and place blush slightly higher on the cheeks for lift.
- Set where needed. If your skin gets shiny, lightly set with translucent powder.
A good beginner rule is blend first, add more second. You can always build. Taking away too much contour is annoying, and usually means redoing part of your base.
How do you contour different face shapes?
You don't need a completely different routine for every face shape, but a few tweaks help.
- Round face: Focus contour on the outer cheeks and temples to create more definition. Keep lines lifted, not horizontal.
- Oval face: Use a light hand. Most oval faces only need soft cheek and temple contour.
- Square face: Blend around the temples and jaw corners to soften angles.
- Heart-shaped face: Add a touch at the temples and lightly under the cheekbones for balance.
- Long face: Keep temple and forehead contour soft, and blend cheek contour more horizontally rather than too high.
Look, face shape guides can get weirdly strict online. Real faces are mixed, asymmetrical, and normal. Use them as a starting point, not a rulebook.
What are the most common contour mistakes beginners make?
When people ask me how to contour for beginners, these are the issues I see most often:
- Using bronzer as contour: Warm orange tones don't mimic shadow well.
- Choosing a shade that's too dark: This creates obvious stripes instead of soft definition.
- Applying too much product at once: A heavy hand is the fastest route to patchiness.
- Blending down instead of up: Downward blending can make features look dragged.
- Bringing cheek contour too low or too far inward: This often makes the face look hollow in the wrong place.
- Ignoring lighting: Makeup that looks fine in a dim bathroom can look harsh in daylight.
- Using the wrong tools: Dense brushes work well for creams; fluffier brushes work better for powders.
One more thing: if your contour keeps looking patchy, the issue may not be the contour itself. Dry patches, too much powder underneath, or a silicone-heavy base that pills can all make product skip. I've seen that a lot in clinic-adjacent beauty chats, actually.
How can you make contour look natural and not cakey?
Natural contour comes down to skin prep, product amount, and blending technique.
Try these simple fixes:
- Prep skin with moisturizer so makeup doesn't catch on dry areas.
- Let sunscreen set for a minute or two before makeup.
- Use less product than you think you need.
- Apply contour to the back of your hand first if the stick is very pigmented, then pick it up with a brush.
- Blend the edges, not just the center.
- If it looks too strong, soften it with a bit of foundation brush leftover product or a clean sponge.
- For powder contour, tap off excess before touching the face.
So, if your goal is a believable everyday look, stop before the contour is fully obvious. Seriously. In person, subtle reads as polished.
Do you contour before or after blush and bronzer?
Contour usually goes before blush, and either before or after bronzer depending on the look you want. A simple order for beginners is:
- Base makeup
- Contour
- Bronzer
- Blush
- Highlighter, if you want it
This order works because contour sets the structure first. Then bronzer adds warmth, and blush brings life back to the cheeks. If everything starts to blur together, use a clean brush to soften the edges where the products meet.
I've found that cream blush over cream contour tends to look especially fresh and beginner-friendly, while powder over powder is usually the easiest pairing for long wear.
The Bottom Line
Learning how to contour for beginners doesn't have to be complicated. Use a contour shade that's slightly deeper and more neutral than your skin tone, place it high on the face, and blend until it looks like a natural shadow. Start with the cheeks and temples, keep the product light, and don't feel like you need to contour every feature.
The best contour is the one that makes people think you look a little more sculpted, not obviously contoured. Practice a few times in natural light, and your placement gets better fast.
If you want more smart beauty tips and a heads-up on Insider Beauty's weekly deals, sign up for our newsletter. It's a nice little way to stay in the loop without much effort.
Want more tips and exclusive beauty deals delivered to your inbox? Pop your email in the box below and join thousands of insiders who save big every week.