
Chrome nails how to achieve the look comes down to three things: a perfectly smooth base, the right chrome pigment, and a no-wipe gel top coat cured at the correct time. That mirror finish happens because ultra-fine reflective powder sits on a slick surface, so even tiny bumps, dents, or leftover tackiness can dull the effect. Here's exactly how to do it at home or ask for it at the salon.
Quick Takeaways
- Chrome nails how to achieve the look: Prep the nail well, apply a smooth base color, cure a no-wipe top coat, then buff chrome powder over the surface.
- The smoothest chrome finish usually happens over gel polish because it creates a hard, even surface for the pigment to grip.
- Base color matters: Silver chrome pops over black, while pearl, glazed, and champagne chrome look softer over nude or milky shades.
- Thin layers work best: Thick polish can wrinkle, dent, or make the chrome look patchy.
- Seal the edges well: Capping the free edge helps prevent early chipping and dullness.
What are chrome nails?
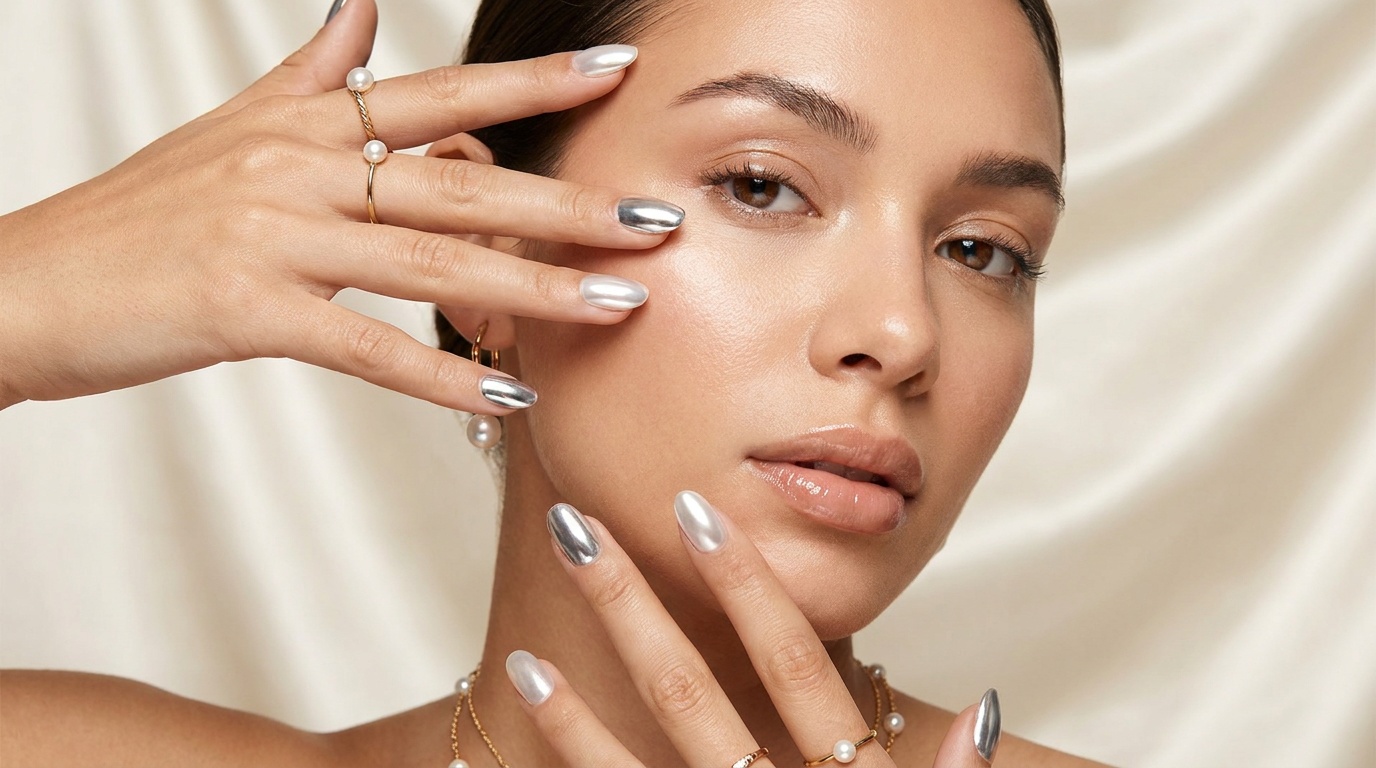
Chrome nails are manicures with a reflective, metallic, mirror-like finish created by rubbing a superfine pigment powder onto polished nails. Depending on the powder and base color, the result can look like liquid metal, glazed donut sheen, pearl shimmer, or even an almost foil-like mirror.
I've found that people often call several looks "chrome," but they're not all the same. The main versions are:
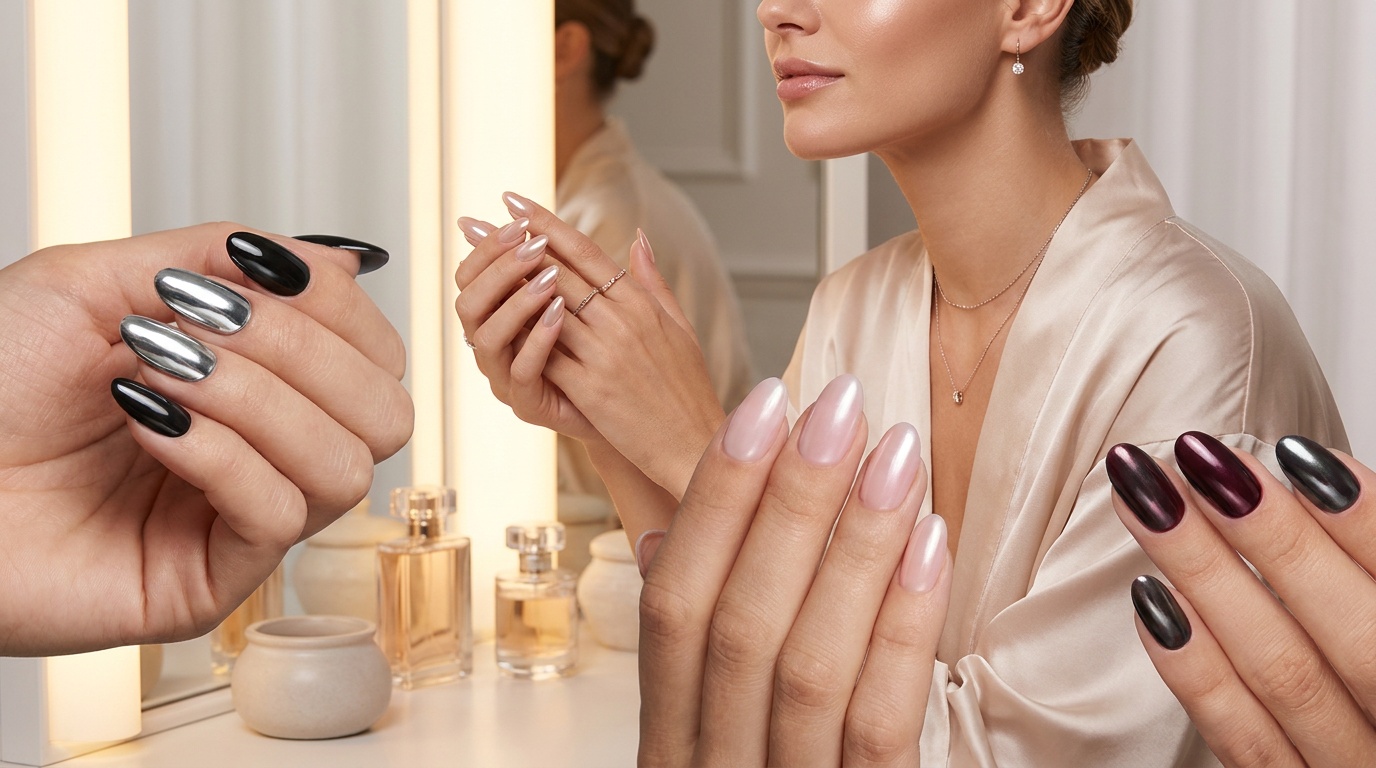
- Mirror chrome: Highly reflective, almost like silver metal
- Pearl chrome: Softer, luminous, and slightly opalescent
- Glazed chrome: Sheer shine over a nude, pink, or milky base
- Colored chrome: Rose gold, blue, lavender, green, or gunmetal finishes
So if you're searching chrome nails how to achieve the look, the first step is deciding which chrome finish you actually want. A glazed manicure needs a different base than a true mirror nail.
How do you achieve chrome nails at home?
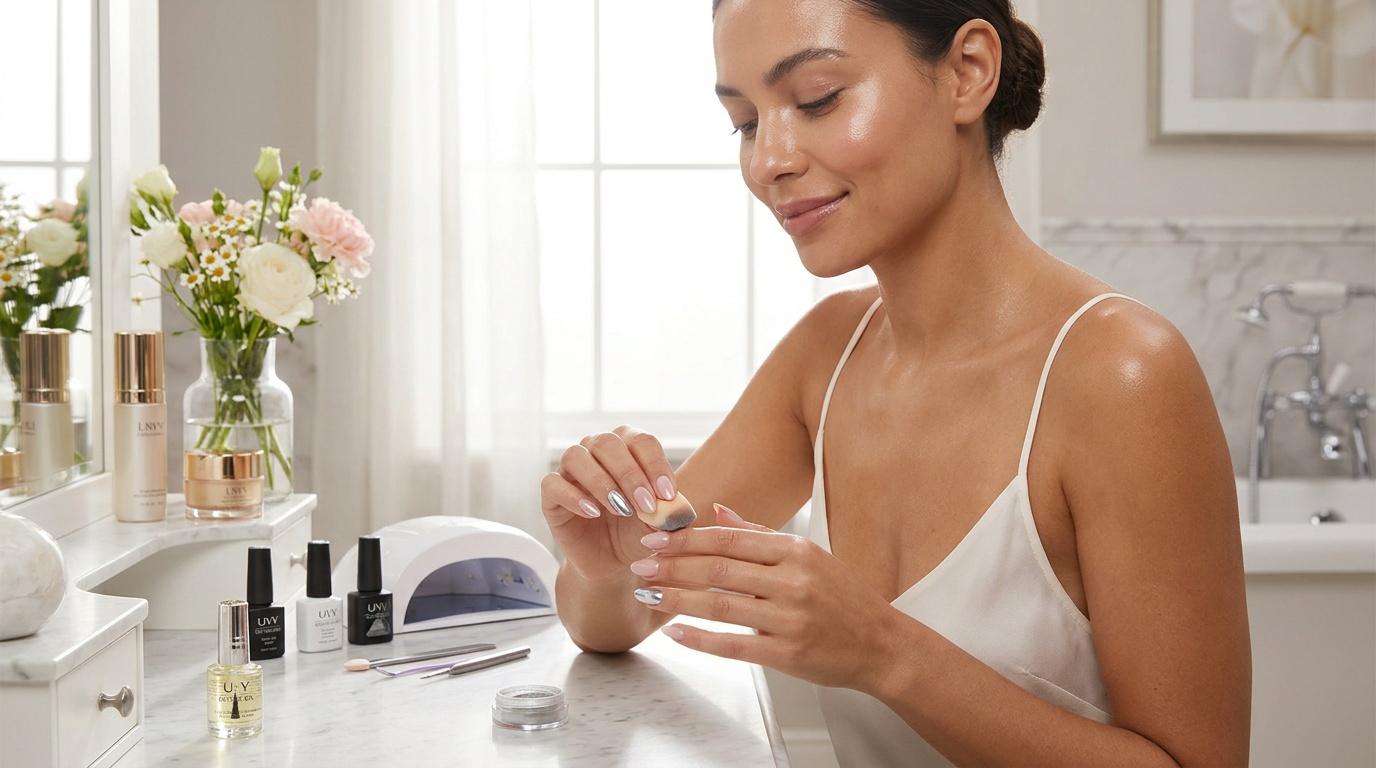
To get chrome nails at home, you need a smooth nail surface, a gel base, chrome powder, and a top coat that lets the pigment buff in evenly. Traditional air-dry polish can work with some hacks, but gel is more reliable.
Follow these steps:
- Remove old polish and wash your hands.
- Shape the nails and gently push back the cuticles.
- Lightly buff the nail plate to smooth ridges.
- Wipe away dust and cleanse the nail with alcohol or nail prep solution.
- Apply a thin base coat and cure if using gel.
- Add 1 to 2 thin coats of your chosen color, curing between coats.
- Apply a no-wipe gel top coat and cure according to directions.
- Use a sponge applicator or fingertip in a glove to rub chrome powder onto the nail.
- Buff until the surface looks smooth and reflective.
- Dust off excess powder with a soft brush.
- Seal with another thin layer of top coat, capping the free edge.
- Cure fully and apply cuticle oil.
The key moment is Step 8. You don't just sprinkle the powder on. You really want to burnish it into the surface with firm, even pressure so it turns from shimmer into that slick chrome finish.
What products do you need for chrome nails?
You don't need a giant kit, but you do need the right product types. Honestly, the wrong top coat causes more frustration than the powder itself.
Here's what helps most:
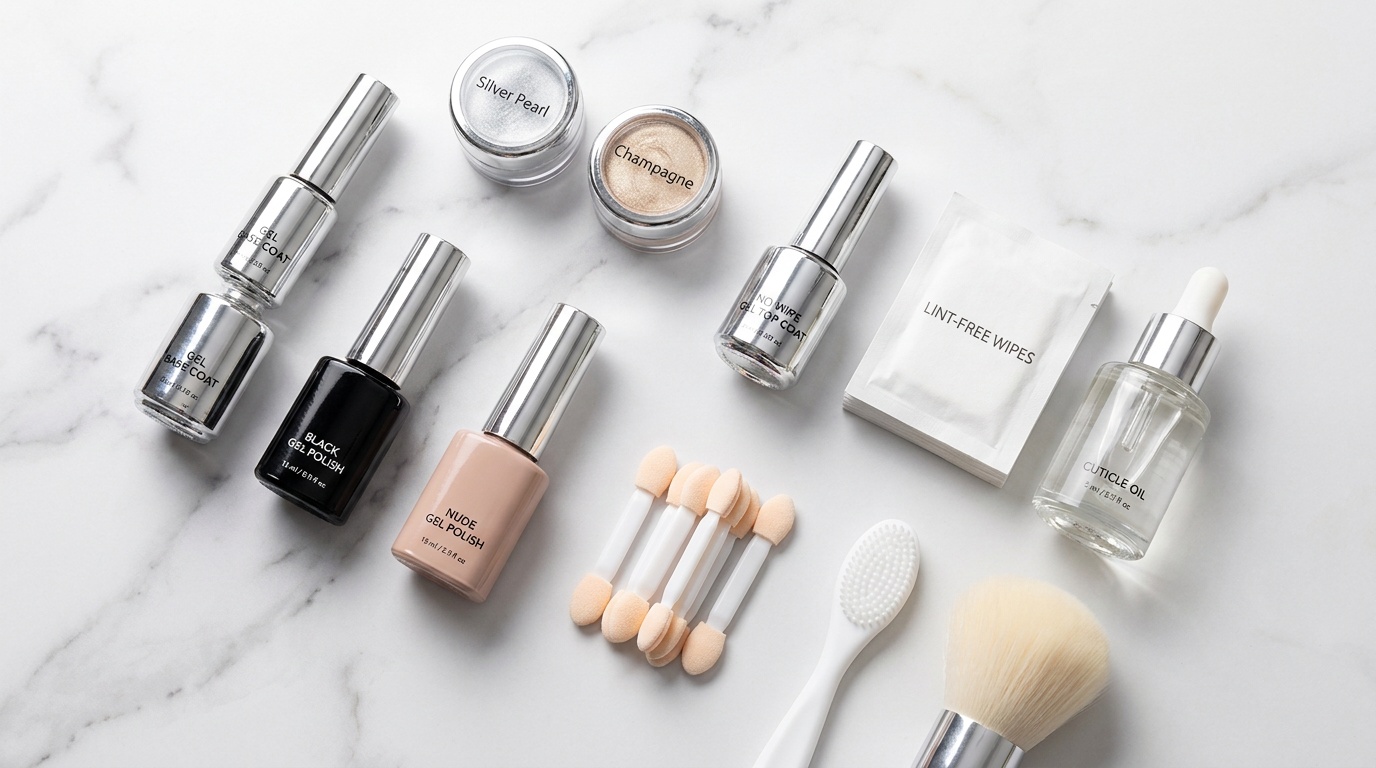
- Base coat: Creates adhesion and helps polish wear longer
- Gel color polish or gel base shade: Gives chrome a smooth, even background
- Chrome powder pigment: The actual reflective powder that creates the effect
- No-wipe gel top coat: Lets the powder buff on without sticking to a tacky layer
- Sponge applicator or silicone tool: Helps press powder into the nail evenly
- Lint-free wipes and alcohol: Useful for prep and cleanup
- Cuticle oil: Restores flexibility and shine around the nail after curing
If you don't use gel, look for a water-based chrome effect powder system or special chrome top coat made for regular polish. But in my experience, classic mirror chrome is hardest to pull off with standard lacquer because the surface stays a bit less uniform.
Which base color is best for chrome nails?
The best base color depends on the finish you want. This is where a lot of DIY manicures go sideways, because the same chrome powder can look completely different over different shades.
A quick guide:
- Black base: Best for silver mirror chrome and bold metallic effects
- White base: Makes iridescent or unicorn chrome look brighter
- Nude or beige base: Ideal for glazed, pearl, and soft champagne chrome
- Pink or milky white base: Great for a clean, sheer glazed finish
- Deep colors like navy or burgundy: Create moodier metallic tones
Look, if you want that trendy clean-girl glazed look, skip black. Use a sheer pink, milky white, or neutral nude instead. If you want high-impact metal, black is usually your best friend.
Why do chrome nails look streaky or dull?
Chrome nails usually look streaky when the nail surface isn't smooth, the top coat isn't compatible, or the powder wasn't buffed in evenly. Dullness can also happen when too much powder sits on top instead of being pressed into the polish.
Common reasons chrome fails:
- Ridges or dents in the nail: Chrome highlights texture instead of hiding it
- Top coat cured incorrectly: Over-cured or under-cured surfaces may not grab pigment properly
- Wrong top coat: A tacky inhibition layer can make the powder go patchy
- Too much powder: Excess can create a dusty, uneven finish
- Thick polish layers: These can wrinkle and distort the reflection
- Poor sealing: The top coat may pull chrome away from the tip if not applied carefully
I've found that a gentle nail buffer is worth using even if your nails already look smooth. Chrome is like highlighter for every microscopic bump. A little prep goes a long way.
How can you make chrome nails last longer?
Chrome manicures can last 2 to 3 weeks with gel when they're applied and sealed well. On natural nails, longevity depends on nail flexibility, how much water exposure you get, and whether you use your nails like tools, which, yeah, most of us do sometimes.
Try these tips:
- Start with dehydrated, oil-free nails before base coat.
- Keep every layer thin to reduce lifting.
- Cap the free edge with color and top coat.
- Seal chrome with a thin first top coat rather than a thick floating layer.
- Wear gloves for dishwashing and heavy cleaning.
- Apply cuticle oil daily to support the surrounding skin and reduce brittleness.
- Avoid picking at the edges, even if one corner starts to lift.
One small trick: if the first sealing coat looks like it's dragging the chrome, use a very light touch and don't overwork the brush. Let the top coat glide on.
Can you get chrome nails without gel?
Yes, but the finish is usually less mirror-like and less durable. If you're trying chrome nails how to achieve the look without a lamp, you'll need either a chrome powder system designed for regular polish or a metallic powder used over slightly dried polish with a specialized top coat.
The process usually looks like this:
- Apply base coat and regular polish color.
- Let the final coat become almost dry, not wet.
- Rub in the chrome powder carefully.
- Brush away excess pigment.
- Seal with a compatible top coat using minimal strokes.
The tradeoff is wear time and smoothness. Regular polish stays softer than gel, so the reflection tends to be more satin-metallic than true mirror chrome. Still pretty, just different.
Are chrome nails safe for natural nails?
Chrome nails are generally safe for natural nails when application and removal are done gently. The biggest issue isn't the chrome powder itself. It's over-buffing, aggressive scraping, and peeling off gel, which can rough up the nail plate and increase breakage.
For healthier wear:
- Buff lightly, not aggressively
- Don't peel off gel or chrome layers
- Use acetone removal as directed rather than scraping hard
- Take breaks if nails feel thin or sensitive
- Moisturize the cuticles daily
As a dermatologist, I always remind people that the skin around the nail matters too. If your cuticles are inflamed, cracked, or sore after manicures, scale back and give the area time to recover.
The Bottom Line
Chrome nails how to achieve the look is actually pretty straightforward once you know the formula: smooth prep, thin gel layers, no-wipe top coat, and firm buffing with chrome powder. If your manicure keeps turning patchy, the issue is usually the surface underneath or the top coat, not your skill.
Start simple with a nude or black base, a chrome powder pigment, and a gel top coat. After that, you can play with pearl, glazed, or full mirror finishes depending on your mood.
If you'd like more beauty tips, trend breakdowns, and smart picks without the guesswork, sign up for Insider Beauty's weekly deals.
Want more tips and exclusive beauty deals delivered to your inbox? Pop your email in the box below and join thousands of insiders who save big every week.